According to The State of Raising Minimum Wage for Restaurants report, most restaurants (80%) have or are considering raising menu prices in their menu management system to help offset the increase in labor costs.
It’s easy to see why. On January 1, 2018, a whopping 18 states and 20 cities in the U.S. – plus many provinces in Canada – saw a significant rise in minimum wage. So, chances are good that you’re part of that 80% looking to make up the cost with price hikes.
While raising prices is an understandable approach (you’ve got to recover those costs somehow, right?), it may not be the best one for your business. Raising your restaurant menu prices across the board is not only a short-term solution to a long-term problem, but you also risk losing customers.
Luckily there are better ways to deal with rising minimum wage – one of which is to improve your restaurant menu design.
Strategic menu design has been proven to grow profits by 15%.
Why Is Restaurant Menu Design the Answer?
Your menu is more than just a vehicle to show customers what dishes you have on offer. A menu can improve their entire dining experience, boost the perceived value of your brand, strategically drive customer buying decisions, and increase your profits.
In fact, menu engineering is proven to increase profits by 10-15%. If you don’t want to leave those profits on the table, you’ll need to create an effective menu design.
This article shares nine restaurant menu design tips you can start implementing today to drastically improve your bottom line. And if you don’t have an existing menu to work with, you can also use menu template services to easily create and customize a new menu for your restaurant.
1) Categorize Menu Items Based on Popularity and Profit
Four distinct categories should drive your menu design. And no, we’re not talking about typical categories such as appetizers, entrées, desserts, and beverages.
Menu engineering is guided by four categories, which include stars, plough-horses, puzzles, and dogs.
Confused? Here’s an explanation.
Each of the categories above represent different levels of popularity and profitability of your dishes. The quadrant below depicts this:
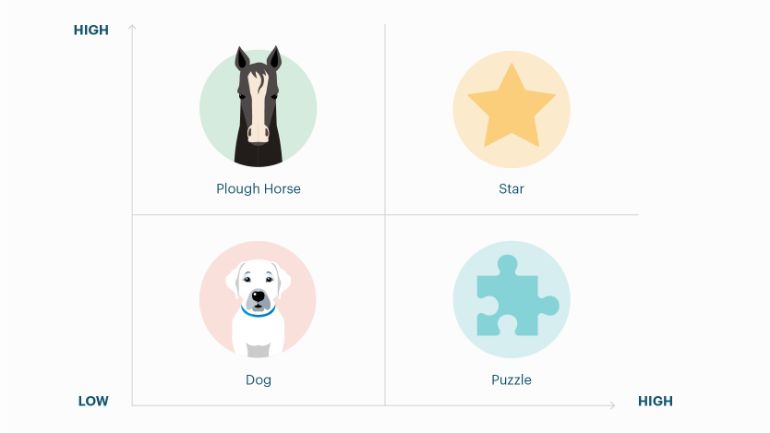
Stars: Very popular and highly profitable dishes.
Plow-horses: Also popular but have low profitability.
Puzzles: Highly profitable but not very popular.
Dogs: Not very popular or profitable.
Classify all your dishes based on these quadrants by doing a cost and sales data analysis. Access your POS data to perform this analysis.
Next, categorize menu items for maximum profit impact and use them to guide your menu engineering efforts. Below are some ideas for each category (strategic placement is discussed later on in this article):
Stars: You’ll want to draw your customers’ attention to these menu items through smart placement and make these items stand out on your menu.
Plow-horses: Because these items are popular, you’ll want to keep them. They might be what’s drawing in customers, getting them through the door. Consider making more profitable versions of these dishes.
Puzzles: While not very popular, you’ll want to keep these profitable dishes and find ways to highlight them and turn them into stars. Once again, smart placement can help.
Dogs: You may want to ‘86 these menu items. If certain dishes appeal to a specific customer segment, consider keeping them but limit their promotion.
By getting your menu classifications straight, you can be more strategic about your menu design instead of taking a hit-and-miss approach. Sure, it may require some effort up front, but this is a small price to pay for massive gains down the line.
2) Limit Choice to Guide Buying Decisions
Your instinct may be to provide customers with as many dishes as possible. The problem? More choice isn’t always better.
Too much choice can actually lead customers to not choose at all. Research shows that too much choice can actually hinder the decision-making process altogether.
For example, in early 2000, psychologists Sheena Iyengar and Mark Lepper published a study that showed shoppers who saw 24 choices of jam were one-tenth less likely to purchase than those who had only six.
Just think about the last time you went to a restaurant that had an extensive menu. Chances are you struggled to make a choice, right? So much so, in fact, that you likely reverted to something tried and true. Burger, anyone?
Your customers are no different. Limiting their choices by offering a smaller menu or creating a prix fixe menu frees them up to try your star dishes, helping you see more profit on every check.
But How Many Is Too Many Menu Items?
The magic number is 7.
According to menu engineer Gregg Rapp, “When we include over seven items, a guest will be overwhelmed and confused, and when they get confused they’ll typically default to an item they’ve had before.”
If diners default to the familiar – especially if those dishes are low-margin dishes – you’ll lose out on profits from those higher-margin items. Speaking of which…
3) Place High-Margin Items in the Golden Triangle
The Golden Triangle is the area of your menu that customers read first. You’ll want to display high-margin items (such as your stars and puzzles) in your Golden Triangle.
But where exactly is the Golden Triangle on your menu?
Aaron Allen – restaurant consultant and expert on the psychology of menu design – says that, “When we look at a menu, our eyes typically move to the middle first, before traveling to the top right corner, and then, finally, to the top left.”
4) Highlight One High-Margin Item per Category
Putting high-margin menu items within your Golden Triangle isn’t enough. By “calling-out” specific menu items in this area, you can help guide a customer’s decision-making process even further.
Bold text, place menu items in italics, and add ribbons and boxes to menu items you want people to notice. While you don’t want to detract from the dining experience with a cluttered menu, you’ll want to add enough cues to guide your customer to make the “right” choice for your restaurant.
But make sure not to overdo the number of items you highlight. If you “call-out” too many items, you’ll end up calling out none. A good guideline to follow is to highlight only one item per category on your menu, e.g. one main or one dessert.
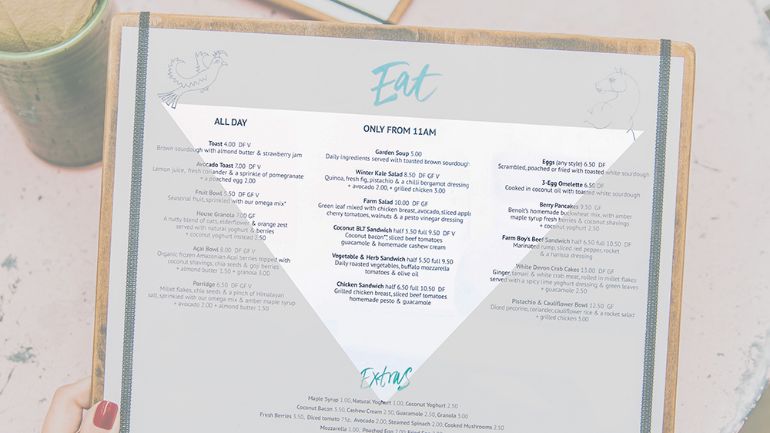
5) Use Photos Sparingly
“A photograph can increase sales of an item by as much as 30% when there is just one photograph on the page,” according to research done by restaurant menu design expert Gregg Rapp.
“Just one.” That’s the key. Having a bunch of photos on each page of your menu only causes clutter and confuses diners.
The quality of the photos also matters. Poor quality images can create a negative perception of the food and the brand as a whole. Think about the last time you went to a restaurant and saw low-quality images of the food. It wasn’t very appetizing, was it?
Bonus tip: Include images on your mobile POS menu so that your servers can show diners a visual of the food before they buy it. There’s nothing more enticing than seeing a beautiful photo of what they’re about to eat. It may just give the diner the push they need to place an order – without adding clutter to their printed menu.
6) Include Menu Modifiers to Upsell
You’re likely already using menu modifiers on your menus and POS to upsell and drive sales. Classic examples of modifiers include offering an extra side to a main or an extra topping to a dessert.
But have you thought about how unconventional modifiers can increase profits? What about coffee with dessert? Or offering a burger by the ounce? You could even give customers the option to include a liqueur with their dessert.
There are many options available so be careful about using every modifier under the sun. If you do, you once again run the risk of creating a “busy” menu that makes it harder for diners to choose.
Strategic menu design has been proven to grow profits by 15%.
7) Update Your Menu for Cross-Selling
Think back to when you purchased something through an online retailer. While making a purchase, how often have you seen the line that reads “Frequently bought together”? Pretty often, right?
That’s cross-selling: a way to get customers to purchase complementary products to increase a company’s revenue.
While cross-selling is popular and effective with online retailers (Amazon credits up to 35% of their revenue to cross-selling), it can also work for restaurant owners.
Sure, it may be difficult to get the same numbers as online retailer giants like Amazon, but if you borrow their proven methods to make a few simple and creative tweaks to your menu, you’ll see a marked increase in profits. Here’s how:
1. Analyze your current menu for pairings.
Review the POS data of your menu to see what items are frequently purchased together. For example, customers may buy specific wines when they have certain dishes.
2. Group complementary items.
Group those pairings in a spreadsheet for easy reference. Because not all items will be suitable for cross-selling purposes (some may have low margins), take note only of items that will add a good boost for you.
3. Highlight chosen items on the menu.
One of our earlier restaurant menu design tips was to “highlight high-margin items on your menu.” You’ll want to follow a similar approach with these complementary dishes, except the goal here is to cross-sell.
For example, right below a main dish, you could feature a suitable wine just below the menu description. This approach helps your customer choose while increasing your bottom line. It’s a win-win.
8) Use Color to Get People to Buy
Different colors trigger different associations and can impact what we buy. So a smart use of color in menus can improve your sales. But what colors should you focus on?
Once again, Aaron Allen provides some guidance. “Green implies that the food is fresh and orange stimulates the appetite. Yellow is a happy hue and is used to capture the diners attention. Red encourages action and is used to persuade us to buy the meals with the highest profit margins.”
Bonus tip: If you’re looking for some ideas on how restaurants use color in their menus, check out some inspirational Pinterest boards.
9) Use Decoy Dishes
Finally, there are decoy dishes. Decoy dishes – as the name suggests – are a way to lure people away from an intended course (pun intended).
In this case, you can place expensive dishes at the top of the menu to create the perception that the other items are better value. By getting people to think they’ve found a bargain, chances are they’ll spend more.
Think about it: How often do you end up spending more than you planned while shopping because you couldn’t resist a good bargain?
While your first instinct may be to increase all prices in response to rising labor costs, thoughtful revisions to your restaurant menu design will bring you better results.
A new menu can have a huge impact on your bottom line, if you design it mindfully. These nine restaurant menu design tips will go a long way to helping you achieve just that.
Strategic menu design has been proven to grow profits by 15%.

Dana is the former Content Marketing Manager at TouchBistro, sharing tips for and stories of restaurateurs turning their passion into success. She loves homemade hot sauce, deep fried pickles and finding excuses to consume real maple syrup.
Download our free inventory template
Sign up for our free weekly TouchBistro Newsletter

Your Complete Guide to Restaurant Reservations
Download Guide